
Halloween Rice Krispie Treats

Fun, colorful Rice Krispie balls dressed up as monsters, mummies, and pumpkins — an easy Halloween project the whole family will love.
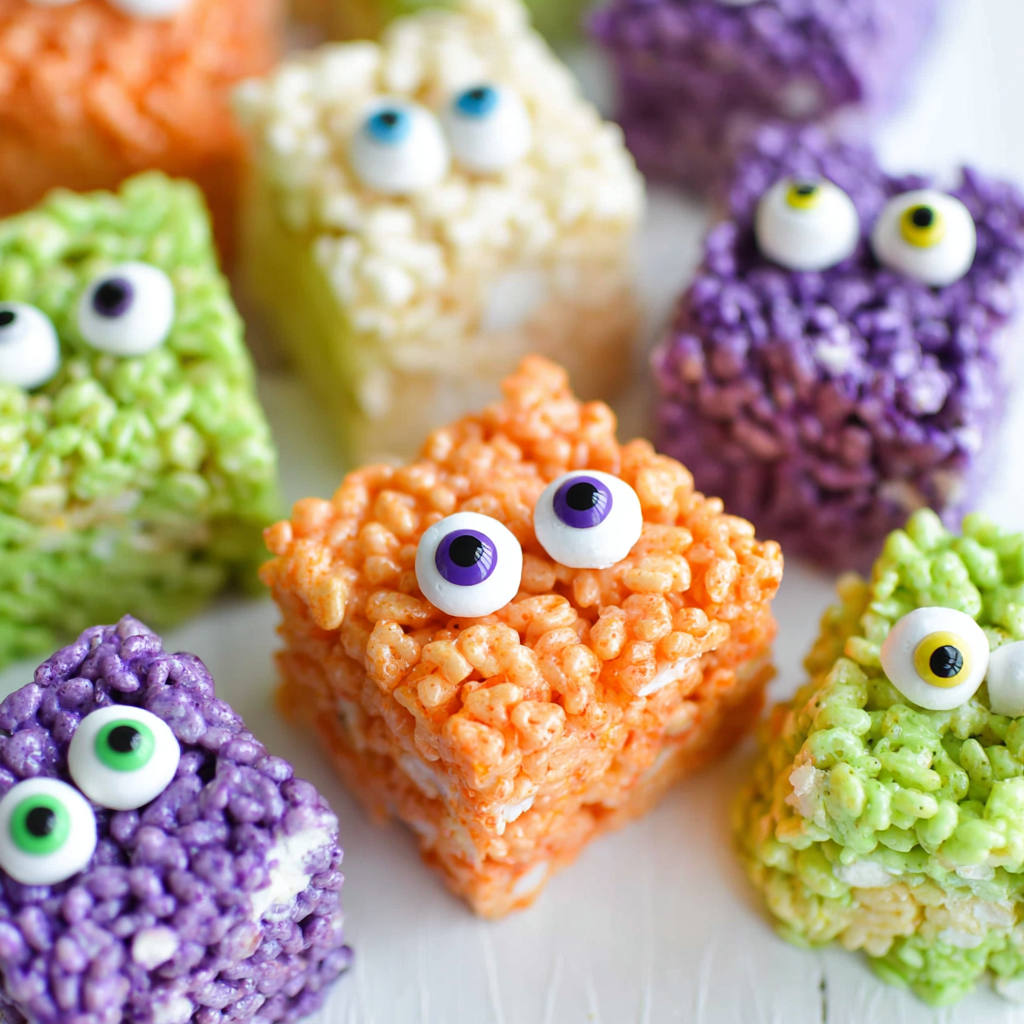
These Halloween Rice Krispie Treats have been a staple at my October get-togethers ever since I first made them with my kids. I discovered this playful approach during a Halloween craft afternoon when I wanted a treat that doubled as an activity: a recipe that was fast, forgiving, and perfect for little hands. The result was three dozen smiling faces — sticky fingers, proud children, and adults who couldn’t resist stealing a few before the party even started. The texture is delightfully crisp at first bite, then tender and chewy as the marshmallow pulls away; the visual impact comes from bold food coloring and oversized candy eyes that turn a simple cereal ball into a spooky character.
What makes this version special is how flexible it is. You can keep it classic with plain white marshmallow and a single candy eye for a minimalist monster, or go full glam with neon colors, sprinkles, and chocolate accents for pumpkins and mummies. I love that it’s an easy recipe to scale, uses pantry-friendly ingredients, and only requires a saucepan and a baking sheet — no baking or special equipment. When my niece helped shape the first batch, she insisted we call one of the monsters "Sir Crunch-a-Lot," and that silly name stuck with us for years.
Why You'll Love This Recipe
- Ready in about 35 minutes from start to finish, making it perfect for last-minute parties or school events.
- Uses pantry staples: butter, mini marshmallows, and Rice Krispies — simple shopping list and easy substitutions.
- Kid-friendly assembly: shaping and decorating turns dessert preparation into a fun craft session for children.
- Highly customizable: change colors, add sprinkles or small candies like M&M’s or chocolate chips to match any theme.
- Make-ahead friendly: stores well for up to three days in an airtight container and travels easily to potlucks.
- Crowd-pleasing portion size: makes approximately 18 bite-sized balls, ideal for parties or classroom treats.
From my experience hosting neighborhood Halloween nights, these treats vanish faster than most cookies. Kids line up to pick their favorite monster, while adults appreciate the compact, non-messy serving size. Over the years I’ve learned that shaping them into uniform 1 1/2-inch balls keeps portions consistent and makes decorating quicker — fewer arguments about the perfect size ball at the craft table.
Ingredients
- Salted butter (4 tablespoons): Use a high-quality stick like Land O'Lakes or Kerrygold for a rich flavor. The butter keeps the marshmallow glossy and prevents sticking; do not skip or substitute with oil.
- Mini marshmallows (10 ounces): A 10-ounce bag is standard in many stores; mini marshmallows melt quickly and create a smooth coating. If you prefer chewier texture, use slightly fewer marshmallows and more cereal.
- Rice Krispies cereal (5–6 cups): About half a standard box. Measure loosely—5 cups yields a softer, sweeter treat, 6 cups gives more crunch and structure.
- Food coloring: Gel or liquid food coloring both work; gels give brighter colors with fewer drops. Wilton and AmeriColor gels are excellent choices.
- Wilton candy eyes (large): I use the large size for dramatic effect — one package provides plenty for this batch. Press them into the warm balls so they adhere.
Instructions
Prep the pan and tools: Line a baking sheet with parchment paper and set it aside. Keep a small bowl of lightly buttered water for your hands so the mixture won’t stick when you shape the balls. Measure cereal into a large mixing bowl so it’s ready when the marshmallow is melted. This staging keeps you from working too quickly while the marshmallow is hot. Melt butter and marshmallows: In a large saucepan over medium-low heat, melt 4 tablespoons of butter until it is shimmering but not browned (about 1–2 minutes). Add 10 ounces of mini marshmallows and stir constantly until the marshmallows are almost completely melted and glossy — about 2–4 minutes. Remove from heat before everything is fully liquefied to avoid scorching. Divide for colors (optional): If making multiple colors, immediately divide the melted marshmallow into two or three heatproof bowls and work quickly. Add a few drops of gel or liquid food coloring to each bowl and fold until the color is uniform. Work in small batches if you want very bright hues. Combine with cereal: Pour the marshmallow mixture over 5–6 cups of Rice Krispies in the large bowl. Use a large spatula or buttered hands to stir until every grain of cereal is coated. Aim for full coverage without overworking — overmixing can crush the cereal and make the texture gummy. Shape into balls: Grease your palms lightly with butter or nonstick spray. Pinch off about 1 1/2-inch portions (roughly 0.6 ounces each) and roll into smooth balls. If the mixture cools and becomes stiff, warm it briefly in a microwave-safe bowl for 10–15 seconds to soften. Decorate: Press a Wilton candy eye into the center of each ball while still warm. For mummies, use white colored mixture and pipe or press thin lines of white candy melts. For pumpkins, press a small piece of green candy or icing on top for a stem. Use sprinkles, mini M&M’s, or melted chocolate to add mouth and detail.
You Must Know
- Keep an eye on the marshmallows: high heat scorches quickly; medium-low is best to get a smooth, glossy melt.
- Store in an airtight container at room temperature — they will stay soft for up to 3 days; avoid refrigeration which can make them hard.
- These treats are not suitable for a vegan diet unless you use plant-based marshmallows and a dairy-free spread.
- If you want a firmer shape, use 6 cups of cereal; for softer, go with 5 cups. Adjust to your texture preference.
My favorite thing about these is how forgiving they are — even when the kids get enthusiastic with the decorations, the structure holds up. Once I made a giant “monster” using an extra batch of the mixture, and it became the centerpiece of our Halloween table. I love that the recipe invites creativity; we often leave out bowls of extras like sprinkles and caramel bits so every child can personalize their treat.
Storage Tips
Store the Rice Krispie treats at room temperature in an airtight container or zipper bag. Layer parchment paper between layers to prevent sticking if you stack them. They are best eaten within 24–48 hours for peak freshness, but will keep up to 3 days. For longer storage, you can freeze them individually wrapped in plastic wrap inside a freezer-safe bag for up to 1 month; thaw at room temperature for 30 minutes before serving. Avoid refrigeration; cold air dries them and changes the texture.
Ingredient Substitutions
For dairy-free versions, substitute butter with a vegan margarine or coconut oil (use refined coconut oil for neutral flavor). For a vegetarian option, use marshmallows labeled vegetarian (some brands use plant-based gelling agents). If you need gluten-free cereal, select a certified gluten-free rice crisp cereal; note that flavor and crunch may differ slightly. Swap candy eyes for edible ink-drawn faces on white chocolate chips if you prefer fewer store-bought decorations.
Serving Suggestions
Arrange the treats on a tiered platter for a striking Halloween display, alternating colors and characters. Pair with warm apple cider or a dark hot chocolate for a spooky cozy table. For a party snack board, place them next to small bowls of pretzels, popcorn, and candy corn for mix-and-match fun. Garnish with edible glitter or powdered sugar "cobwebs" for an elevated look at grown-up gatherings.
Cultural Background
Rice krispie confections are a classic American no-bake treat that became popular in mid-20th century home baking for their simplicity and kid-friendly nature. Adapting them to Halloween decorations is a modern twist that leverages bright food coloring and novelty candies to create themed treats without complex techniques. This playful adaptation reflects the broader American tradition of turning simple sweets into holiday-specific delights.
Seasonal Adaptations
Change colors and adornments to match any season: pastels and tiny sugar eggs for spring, red and green with peppermint chips for winter holidays, or orange and brown with cinnamon for autumn harvest themes. During Valentine's Day, make heart-shaped versions and press a single candy eye or chocolate heart for an adorable twist.
Meal Prep Tips
Make the marshmallow mixture and cereal assembly the day before, then shape and decorate on the event day to keep decorations crisp. If preparing ahead, store the plain balls in an airtight container and add candy eyes or sprinkles just before serving. Use shallow, sealable containers to avoid crushing decorations during transport.
Bring these to your next Halloween party and watch how fast they disappear. They’re a simple, joyful recipe that invites creativity and brings people together — and once you start experimenting with colors and mix-ins, you’ll never look at plain cereal bars the same way again.
Pro Tips
Work quickly when shaping — the mixture sets as it cools. Keep your hands buttered to prevent sticking.
If the mixture becomes too stiff, microwave in a heatproof bowl for 10–15 seconds to soften before shaping.
Use gel food coloring for brighter hues with less liquid to avoid changing the texture.
Press candy eyes into warm balls so they adhere without additional icing.
This nourishing halloween rice krispie treats recipe is sure to be a staple in your kitchen. Enjoy every moist, high protein slice — it is perfect for breakfast or as a wholesome snack any time.
Tags
Halloween Rice Krispie Treats
This Halloween Rice Krispie Treats recipe makes perfectly juicy, tender, and flavorful steak every time! Serve with potatoes and a side salad for an unforgettable dinner in under 30 minutes.
Ingredients
Main
Instructions
Prepare the pan and tools
Line a baking sheet with parchment paper, butter your hands lightly, and measure cereal into a large bowl so everything is ready once the marshmallows melt.
Melt butter and marshmallows
In a large saucepan over medium-low heat, melt 4 tablespoons butter then add 10 ounces mini marshmallows. Stir constantly until almost fully melted and glossy, about 2–4 minutes. Remove from heat.
Divide for colors (optional)
If making multiple colors, divide melted marshmallow into heatproof bowls and add food coloring until uniform. Work quickly — marshmallow hardens as it cools.
Stir in cereal
Pour marshmallow mixture over 5–6 cups Rice Krispies and fold with a spatula until fully coated, aiming for even coverage without crushing the cereal.
Shape and decorate
With buttered hands, shape into 1 1/2-inch balls (about 0.6 ounces each). Press candy eyes into each warm ball and add other decorations while still tacky.
Last Step: Please leave a rating and comment letting us know how you liked this recipe! This helps our business to thrive and continue providing free, high-quality recipes for you.
Nutrition
Did You Make This?
Leave a comment & rating below or tag
@yummique on social media!
Categories:
You might also like...

Cheesy Zucchini Rollatini Bake
Tender grilled zucchini wraps basil ricotta, bathed in marinara and mozzarella, baking into a bubbly, lighter Italian comfort dinner ready in 30 minutes.

Air Fryer Zucchini and Squash
Crisp-edged, tender-in-the-middle zucchini and yellow squash made in 15 minutes with pantry spices. A vibrant, veggie-forward side everyone devours.

Chicken Meatball Parmesan
Tender chicken meatballs simmered in rich marinara and blanketed with melty mozzarella, bringing all the flavors of chicken parm in cozy, bite-sized form.
Did You Make This?
Leave a comment & rating below or tag @yummique on social media!
Rate This Recipe
Share This Recipe
Enjoyed this recipe? Share it with friends and family, and don't forget to leave a review!
Comments (1)
This recipe looks amazing! Can't wait to try it.
Comments are stored locally in your browser. Server comments are displayed alongside your local comments.

Hi, I'm Amira!
What's Popular

30-Minute Meals!
Join to receive our email series which contains a round-up of some of our quick and easy family favorite recipes.