
Seven Layer Magic Bars

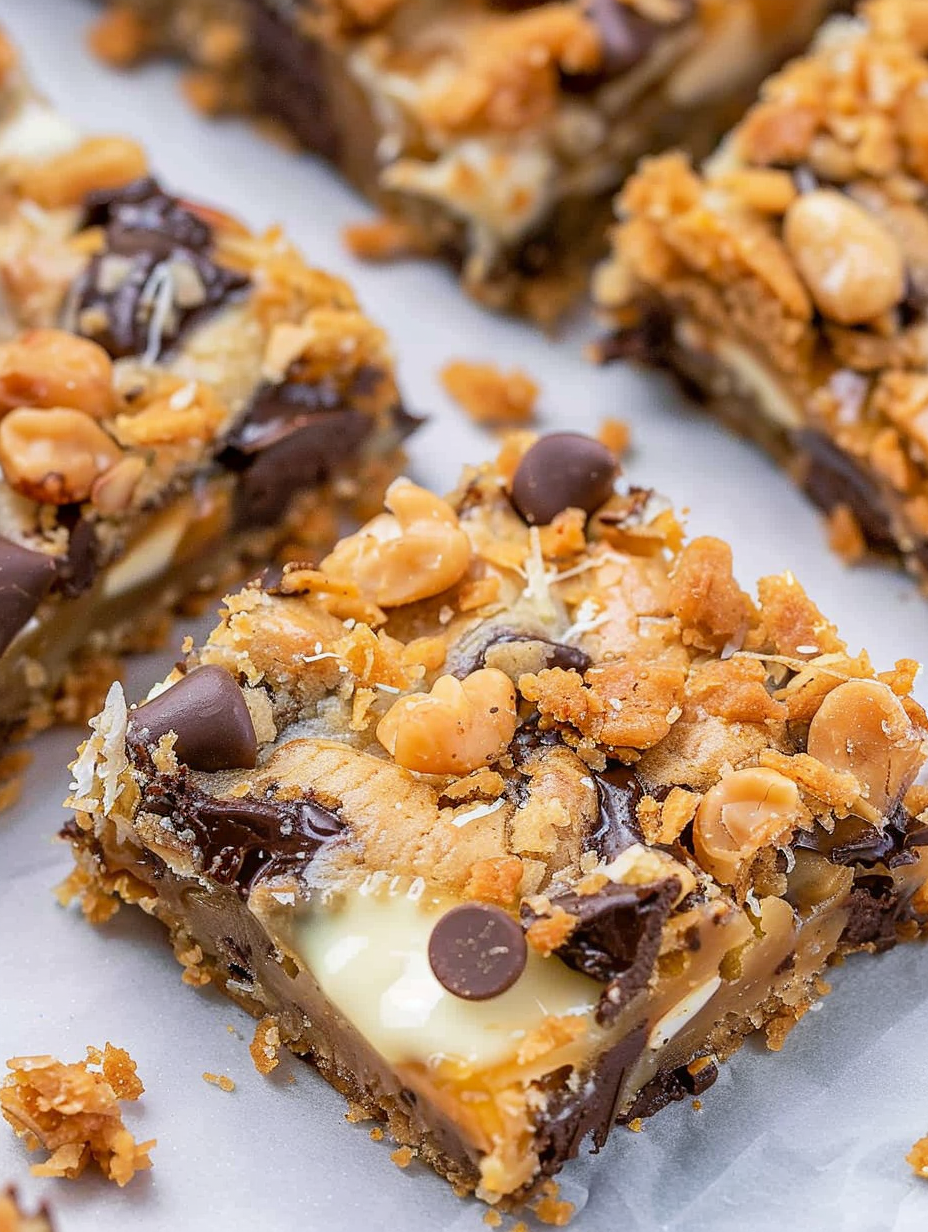
A nostalgic, buttery graham cracker base layered with chocolate chips, butterscotch chips, coconut, walnuts and a sweetened condensed milk blanket—easy crowd-pleasing bars.
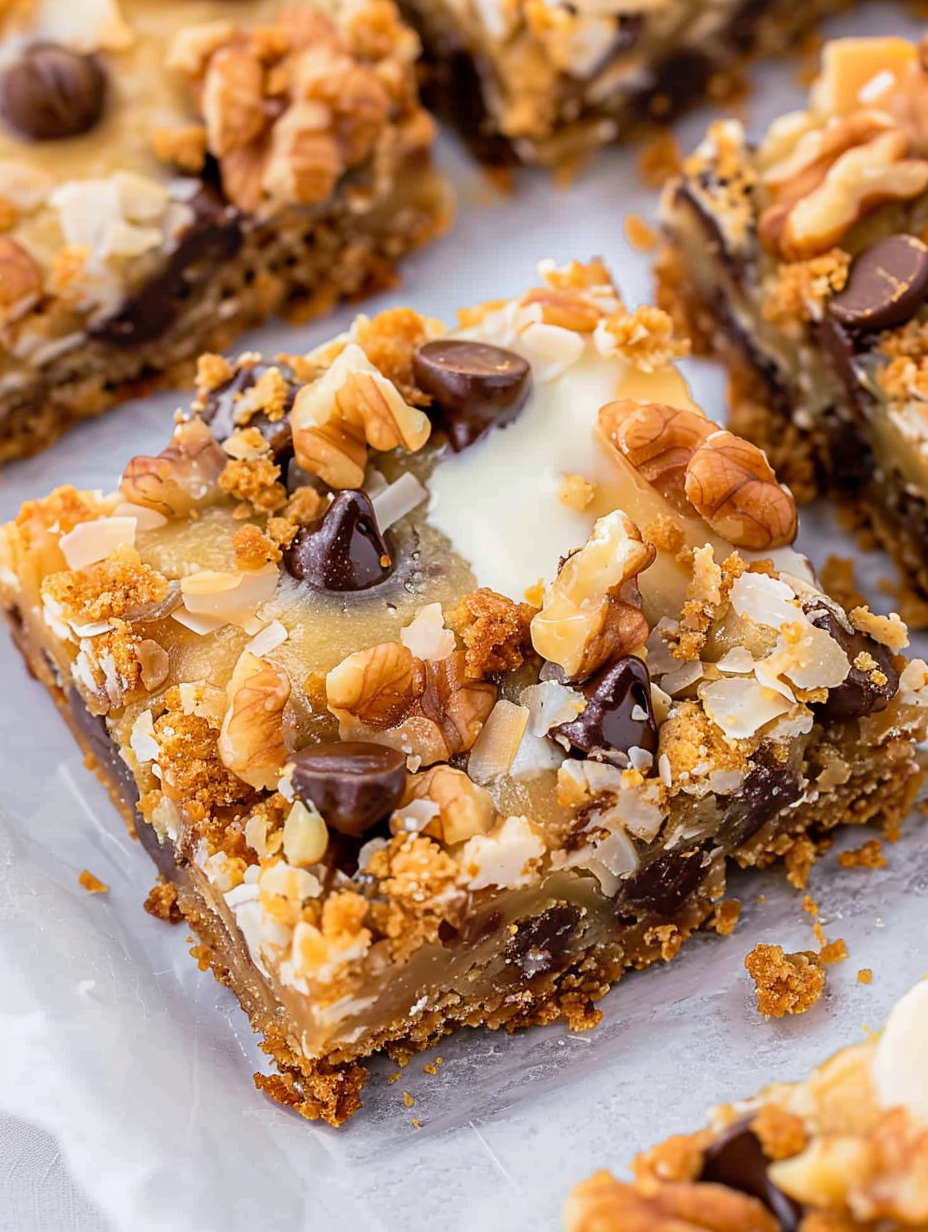
This recipe for Seven Layer Magic Bars is the sort of comfort dessert that instantly transports me back to potlucks, summer picnics and family holidays. I first perfected this version years ago when I wanted something that required almost no hands-on time but delivered a crowd-pleasing result. The combination of a crisp buttery graham cracker crust, pockets of chocolate and butterscotch, chewy coconut, crunchy walnuts, and the glossy, caramelized finish from sweetened condensed milk is pure nostalgia on a plate. Every time I bring these bars to a gathering they disappear within minutes—people literally fight over the last piece.
What makes this version special is the balance of texture and sweetness: the crust gives structure, the chips and coconut provide chew and melty bits, and the condensed milk ties everything together into a unified, slightly gooey slice that still holds when cut properly. I learned a couple of small tricks (lining the pan and chilling before slicing) that turn a messy panful into tidy, pretty bars ideal for packing in lunchboxes or presenting at a potluck. These bars are easy to scale and forgiving, which is why they're one of my go-to make-and-bring desserts.
Why You'll Love This Recipe
- Very little active time: 5 minutes of prep and about 30 minutes in the oven means you can pull these together between other tasks and still present a homemade treat.
- Pantry friendly: most ingredients are staples—graham crackers, chips, coconut, nuts and a can of sweetened condensed milk—so it’s perfect for last-minute baking.
- Crowd-pleasing and portable: firm enough to travel and easy to stack in containers for parties, bake sales or lunches.
- Make-ahead friendly: these improve after a few hours chilled, so you can bake the day before and slice right before serving.
- Customizable layers: swap nuts, use different chips, or add dried fruit to suit tastes or dietary needs.
- Kid-approved and simple enough for beginner bakers—no special equipment or advanced technique required.
I remember the first time I made these for a neighborhood block party: the pan was empty within the hour and a neighbor asked for the recipe on the spot. The balance of crunchy, chewy and sweet makes them addictive, and the simple technique makes them my reliable dessert when I need a winner fast.
Ingredients
- Graham cracker crumbs (1 1/2 cups): Use full‑flavored graham crackers—Honey Maid or a store brand equivalent—to get a buttery, slightly sweet base. To make crumbs, pulse about 11–12 full rectangular crackers in a food processor until fine.
- Unsalted butter (1/2 cup): Melt and mix into the crumbs for a sturdy, flavorful crust. Use unsalted so you control the salt level; if you only have salted butter, omit any extra salt in other additions.
- Semisweet chocolate chips (1 cup): Classic semisweet chips hold their shape while softening during baking. Ghirardelli or Nestlé work well; use mini chips if you want more even distribution.
- Butterscotch chips (1 cup): These add a deep caramel note—sweet and buttery—and contrast beautifully with the semisweet chocolate. If you can’t find them, caramel chips are an acceptable swap.
- Sweetened flaked coconut (1 cup): Use sweetened for chew and caramelization; unsweetened will be drier and less cohesive.
- Chopped walnuts (1/2 cup): Toast lightly if you want more pronounced nuttiness; pecans are a great substitute.
- Sweetened condensed milk (1 can, 14 oz): The glue and caramelizing agent—pour it evenly to coat the chips and coconut so everything binds as it bakes.
Instructions
Preheat and prepare: Preheat the oven to 350°F (177°C). Spray a 9x13 inch baking pan with cooking spray or line it with parchment paper, leaving an overhang on two sides to lift the slab out later. Lining the pan makes removal and cleanup much easier; crumple the parchment briefly before lining so it conforms to the pan. Make the crust: Melt 1/2 cup unsalted butter gently in a small saucepan or microwave. Remove from heat and stir in 1 1/2 cups graham cracker crumbs until evenly coated and the mixture holds together when pressed. Press the mixture firmly into the bottom of the prepared 9x13 pan to form an even crust—use the bottom of a measuring cup for an even, compact layer. Layer the toppings: Working quickly, sprinkle 1 cup semisweet chocolate chips evenly over the crust, then 1 cup butterscotch chips, 1 cup sweetened flaked coconut, and 1/2 cup chopped walnuts. Try to distribute each ingredient evenly so every bar has a little of each component. Top with condensed milk: Open a 14 oz can of sweetened condensed milk and pour it evenly over the layered toppings. Use a rubber spatula to gently spread so the milk covers most of the surface—this helps everything bind. Don’t overwork or press down on the layers too hard; a gentle even coat is all you need. Bake until set: Bake in the preheated 350°F oven for 25–30 minutes. Look for golden-brown edges and a middle that is set but still slightly soft—it will firm as it cools. If the top is browning too fast, tent loosely with foil for the last 5–10 minutes. Cool and slice: Allow the pan to cool completely on a rack before cutting—this can take at least 1 hour. For neater slices, refrigerate for 1–2 hours to firm up, then use a sharp knife wiped between cuts to slice into approximately 18 bars.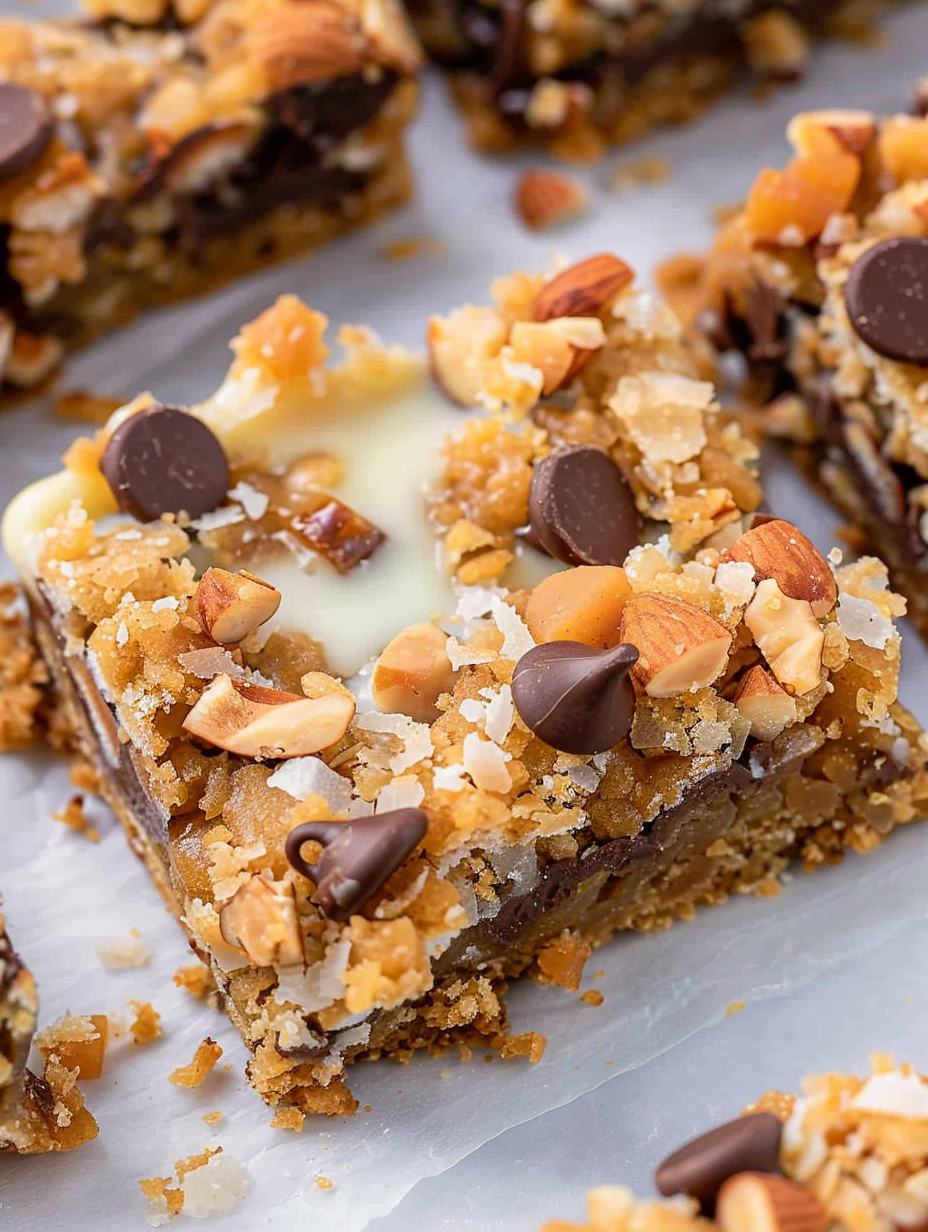
You Must Know
- These bars are rich: one bar is approximately 275 calories—perfect for sharing or small portions.
- Storage: keep in an airtight container in the refrigerator for up to 5 days, or freeze for up to 3 months; thaw in the fridge before serving.
- Texture: cooling and chilling firm the center so slices hold; cutting warm will produce messy wedges.
- Allergens: contains dairy, tree nuts and gluten unless you substitute accordingly (see substitutions).
My favorite part is the way the condensed milk caramelizes slightly around the edges—those bites are irresistible. I find chilling the pan for a couple of hours overnight makes slicing effortless and gives me neatly layered bars to pack for coffee mornings or bake sales.
Storage Tips
Store cooled bars in a single layer or separated by parchment in an airtight container. At room temperature they’ll keep for 1–2 days; for longer storage refrigerate for up to 5 days. To freeze, wrap the entire slab in plastic wrap and foil, or cut into bars and freeze in a single layer on a baking sheet before transferring to a freezer-safe container. Thaw in the fridge overnight and bring to room temperature for 20–30 minutes before serving for best texture.
Ingredient Substitutions
If you need to adapt, try these swaps: for a nut-free version use sunflower seeds or omit nuts; for gluten-free use gluten-free graham-style crumbs or crushed gluten-free cookies; to make dairy-free use vegan butter and dairy-free chocolate and butterscotch chips, plus a dairy-free evaporated condensed milk alternative. Swapping pecans for walnuts gives a sweeter, slightly softer crunch; mini chocolate chips disperse more evenly than full-size chips.
Serving Suggestions
Serve plain with coffee or a glass of milk, or dust lightly with cocoa or confectioners’ sugar for presentation. For a party, top individual bars with a small scoop of vanilla ice cream and a drizzle of hot fudge or caramel. They also pair well with fresh berries to cut the sweetness and add brightness.
Cultural Background
Seven-layer bars, sometimes called “magic bars” or “hello dolly bars,” are an American dessert classic with roots in mid‑20th-century home baking. They became popular because they use convenience ingredients—chips, canned milk and crackers—making them ideal for quick, comforting desserts. Regional variations exist, with different nuts or chips reflecting local preferences, but the basic concept of a layered pan dessert remains the same.
Seasonal Adaptations
Adapt the layers by season: add dried cranberries and chopped pecans for fall or winter, use white chocolate and peppermint chips for holiday treats, or swap in chopped toasted macadamia nuts and macadamia nut chips for a tropical summer variation. The technique is unchanged—just adjust baking time slightly if using very moist add-ins.
Meal Prep Tips
Bake a full sheet and portion into individual servings for grab-and-go snacks. Refrigerating before slicing yields neat bars that travel well. For portion control, cut into smaller squares and arrange in muffin liners for a buffet-style display. Keep them chilled if you’re serving outdoors on a warm day to prevent the condensed milk from becoming overly soft.
These bars represent the perfect balance of simplicity and deliciousness—easy to make, easy to share, and full of nostalgic charm. Try making them for your next gathering and watch them become a fast favorite.
Pro Tips
Crumple parchment paper before lining the pan so it conforms and stays put.
Press the graham crust evenly using the bottom of a measuring cup to create a compact base.
Chill the pan for 1–2 hours before slicing to get clean, structured bars.
If the top browns too quickly, tent loosely with foil for the final 5–10 minutes of baking.
Use mini chocolate chips for more even distribution in each bite.
This nourishing seven layer magic bars recipe is sure to be a staple in your kitchen. Enjoy every moist, high protein slice — it is perfect for breakfast or as a wholesome snack any time.
FAQs about Recipes
How do I get clean slices?
Yes—line the 9x13 pan with parchment and allow the bars to cool completely, then refrigerate for 1–2 hours before lifting out and slicing.
How long do these keep?
Store cooled bars in an airtight container in the fridge for up to 5 days or freeze for up to 3 months.
Tags
Seven Layer Magic Bars
This Seven Layer Magic Bars recipe makes perfectly juicy, tender, and flavorful steak every time! Serve with potatoes and a side salad for an unforgettable dinner in under 30 minutes.
Ingredients
Crust
Layers
Instructions
Preheat and prepare pan
Preheat the oven to 350°F (177°C). Spray a 9x13 inch pan with cooking spray or line with parchment paper leaving an overhang on two sides to lift the slab out after baking.
Make the crust
Melt 1/2 cup unsalted butter and stir in 1 1/2 cups graham cracker crumbs until the mixture holds together. Press firmly into the bottom of the prepared pan using the bottom of a measuring cup to compact evenly.
Layer the toppings
Evenly sprinkle 1 cup semisweet chocolate chips, then 1 cup butterscotch chips, 1 cup sweetened flaked coconut and 1/2 cup chopped walnuts over the crust so each bar will contain a balanced mix.
Top with condensed milk
Pour a 14 oz can of sweetened condensed milk evenly over the layered toppings and gently spread with a rubber spatula to ensure coverage without pressing the layers down.
Bake
Bake at 350°F for 25–30 minutes until the edges are golden brown and the center is set. If the top browns too fast, tent with foil for the last 5–10 minutes.
Cool and slice
Cool completely on a wire rack, then refrigerate 1–2 hours for clean slicing. Use parchment overhang to lift the slab, place on a cutting board, and slice into 18 bars with a sharp knife.
Last Step: Please leave a rating and comment letting us know how you liked this recipe! This helps our business to thrive and continue providing free, high-quality recipes for you.
Nutrition
Did You Make This?
Leave a comment & rating below or tag
@yummique on social media!
Categories:
You might also like...

Cheesy Zucchini Rollatini Bake
Tender grilled zucchini wraps basil ricotta, bathed in marinara and mozzarella, baking into a bubbly, lighter Italian comfort dinner ready in 30 minutes.

Air Fryer Zucchini and Squash
Crisp-edged, tender-in-the-middle zucchini and yellow squash made in 15 minutes with pantry spices. A vibrant, veggie-forward side everyone devours.

Chicken Meatball Parmesan
Tender chicken meatballs simmered in rich marinara and blanketed with melty mozzarella, bringing all the flavors of chicken parm in cozy, bite-sized form.
Did You Make This?
Leave a comment & rating below or tag @yummique on social media!
Rate This Recipe
Share This Recipe
Enjoyed this recipe? Share it with friends and family, and don't forget to leave a review!
Comments (1)
This recipe looks amazing! Can't wait to try it.
Comments are stored locally in your browser. Server comments are displayed alongside your local comments.

Hi, I'm Amira!
What's Popular

30-Minute Meals!
Join to receive our email series which contains a round-up of some of our quick and easy family favorite recipes.